“I just started using FL Studio, but I have no idea how the Mixer works…”
“What is the Mixer actually for? How do I even get started with it?”
If these questions sound familiar, you’ve come to the right place.
I’ve been producing music in FL Studio for about 7 years. Today, I create professional-level tracks, but I started exactly where you are now. If you listen to my early tracks on YouTube and compare them to my current work, the difference in quality is night and day—and most of that comes down to mastering the mixer.
Check out my latest release (as of April 2026) here:
Here’s the truth: Understanding the Mixer is the single biggest factor in determining the final quality of your music.
In this guide, I’ll break down everything beginners need to know:
The Mixer is an essential tool you will use in every single project. Let’s dive in and elevate your production skills.
*Note: If you need help with FL Studio’s language settings or basic setup, check out this article.
I’ve also prepared a video walkthrough for those who prefer visual learning. Watch it here:
What Is the Mixer? (The Core Concept)
Simply put, the Mixer is where you blend and polish your sounds (Mixing).
Imagine you have drums, bass, and a melody all playing at once. If you just leave them as they are, the frequencies will clash, making the track sound muddy and unprofessional.
By using the Mixer to adjust levels and apply processing, you can create a balanced, clear, and punchy track.
Here are the primary functions of the Mixer:
In short, the Mixer is the control center for your final sound.
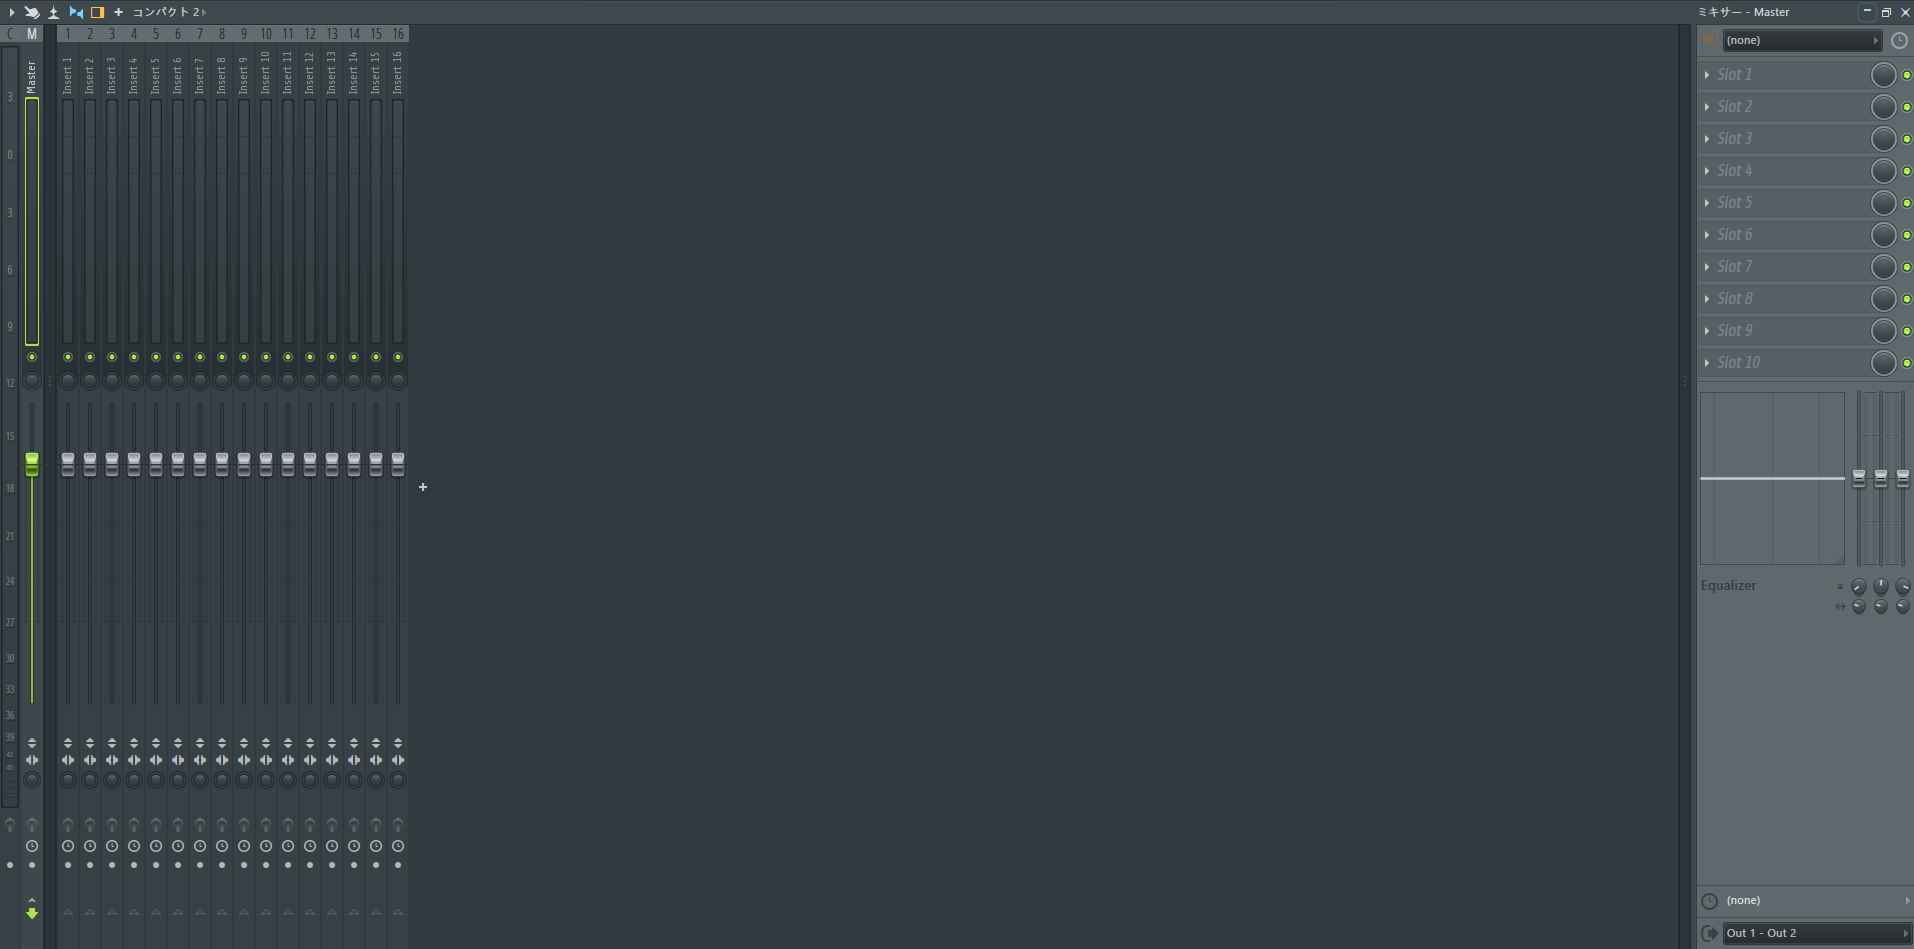
Understanding the Mixer Interface
Before moving sliders, you need to understand the basic structure.
In FL Studio, every sound source (Patterns or Audio Clips) must be assigned to a Mixer Track to be processed.
Once you place a sound in your Playlist, you can send it to the Mixer using these methods:
The Auto-Assign method is a massive time-saver.
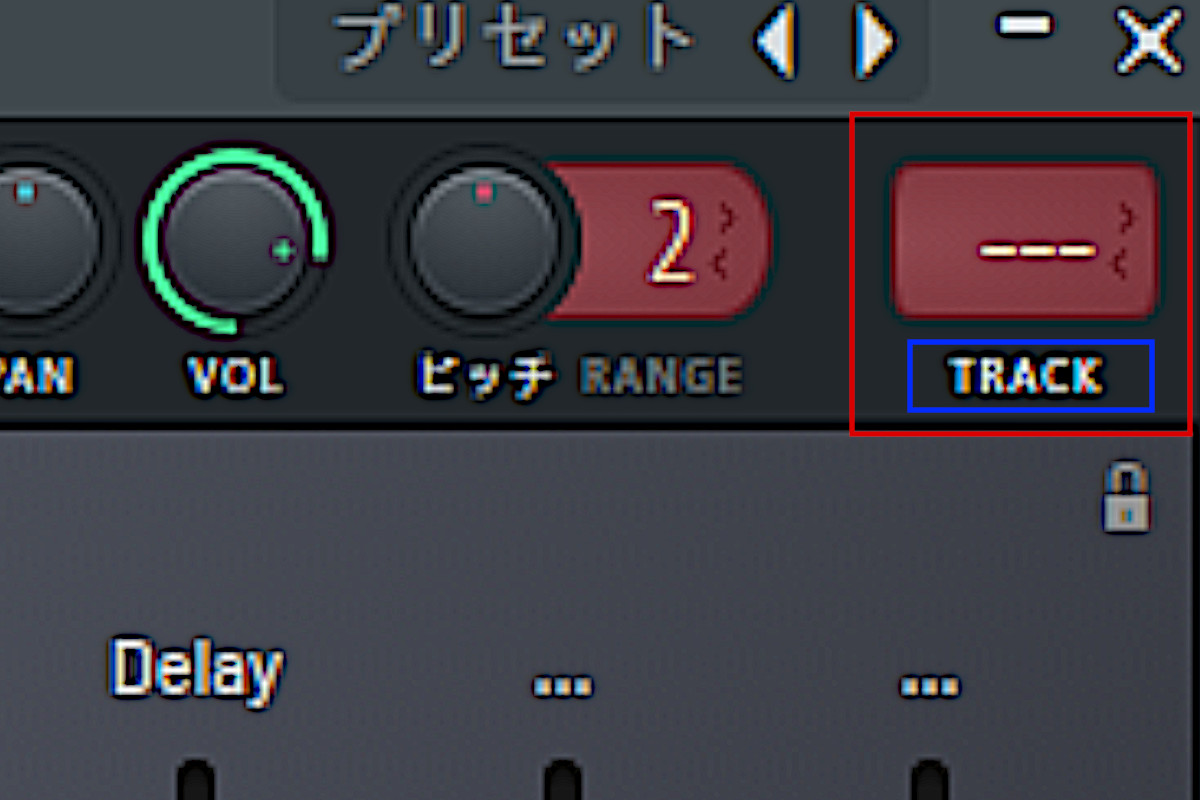
Just click the “Track” area below the mixer number in the instrument window. It will automatically assign it to an empty track and rename it for you.
This keeps your project organized and speeds up your workflow significantly.
Next, let’s look at the four main sections of the Mixer screen:
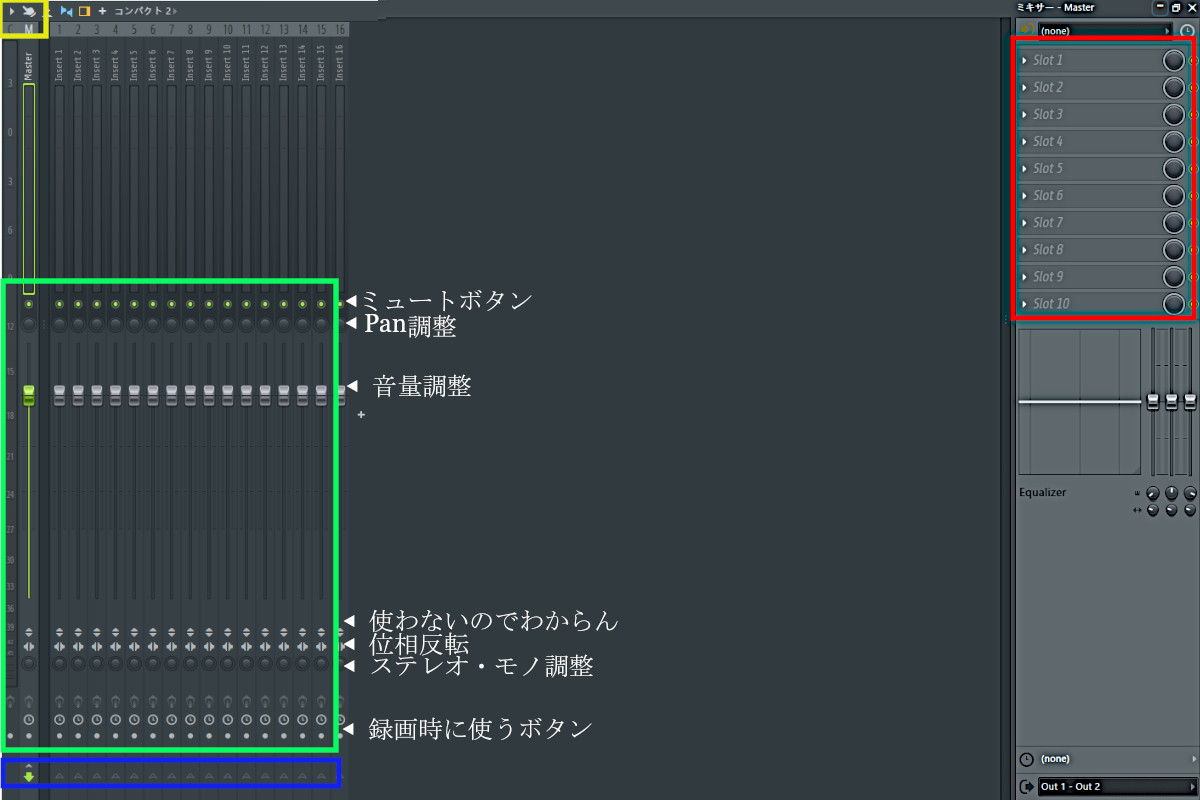
Once you master these four sections, you’ve mastered the basics of FL Studio mixing.
Tip: There is a built-in basic EQ at the bottom of the Effects slots. I often use this for quick frequency tweaks on FX or background elements.
How to Use the Mixer (Step-by-Step)
Now, let’s get into the actual workflow. I’ll assume you’ve already assigned your sounds to mixer tracks as explained above.
For a professional result, follow these three essential steps:
Following this order consistently will help you build a solid foundation for every mix.
1. Applying Effects (EQ, Compression, etc.)
First, we shape the character of each sound using effects.
Click on an empty slot in the Effects Slots (the red area) to see a list of your plugins. Selecting a plugin like an EQ or Reverb will instantly apply it to that track.
In the beginning, focus on the “fun” of changing the sound, but keep the “Signal Chain” in mind.
In FL Studio, effects are processed from top to bottom:
For example, a standard professional chain might look like this:
This order ensures a clean and natural sound. You can also use your mouse wheel over a slot to quickly change the order of effects.
2. Balancing Volume and Panning
Next, we create a sense of space and depth.
A good rule of thumb is to keep your individual track levels around -6dB. This provides “headroom,” preventing the Master track from clipping (distorting).
Using Panning allows you to place sounds in the stereo field (Left or Right), which clears up room in the center for the most important elements.
Here’s a basic strategy:
Pro Tip: You can Right-click any volume fader or Pan knob and select “Create automation clip” to make the sound move dynamically throughout your song.
I’ve detailed that process here:
https://touya-blog-life.com/how-to-use-fl-studio-part-5-how-to-set-up-and-use-automation/
3. Routing and Busses (The Secret to a Pro Mix)
Finally, we decide where the audio goes. By default, every track is sent directly to the Master Track.
However, professional producers use Bus Tracks (Groups) to process multiple sounds together.
Common groups include:
To route a track, select it, then “Shift + Click” the arrow icon at the bottom of the destination track. This “links” them.
Note: Always make sure your destination track is ultimately connected to the Master, or you won’t hear any sound!
In my personal projects, I use a very organized routing system:
While you don’t need to be this complex starting out, using Busses will give your tracks a “glued” and professional feel.
Also, having a high-quality audio interface is crucial for hearing these subtle changes accurately. I’ve been using my Focusrite interface for over 5 years. Check out my long-term review here:
[Focusrite Review] Why I’ve Used This Interface for 5+ Years
Summary: The Mixer Defines Your Sound
Let’s recap the key points:
The FL Studio Mixer might look intimidating at first, but it is your best friend. By following these steps, you are guaranteed to improve the quality of your music.
A better mix means a better emotional connection with your listeners.
Once you’re comfortable with the interface, check out my favorite built-in FL Studio effects to take your sound even further:


コメント